Last updated on: 25 June, 2024
“How to Transfer Photos From iPhone to PC?” – In today’s digital age, capturing moments with your iPhone has become second nature. From breathtaking landscapes to candid family gatherings, our iPhones hold precious memories that we often want to preserve and share on our PCs. However, transferring photos from an iPhone to a PC can be daunting for many, especially with the myriad of options available. This guide is designed to walk you through the entire process, ensuring a seamless transfer. Whether you’re using iCloud, a USB cable, or other methods, we’ve got you covered.
Let’s dive in and make sure those cherished memories are safely stored on your PC.
Why Transfer Photos from iPhone to PC?
Transferring photos from your iPhone to your PC is essential for several reasons. Firstly, it ensures that your precious memories are backed up and safe from potential data loss due to device damage or loss. Secondly, storing photos on a PC provides more storage space, freeing up valuable space on your iPhone. Lastly, it allows for easier photo editing, sharing, and printing from your PC.
Prerequisites for Transferring Photos
Before diving into the various methods of transferring photos, ensure you have the following:
- A USB cable compatible with your iPhone.
- A stable internet connection (for iCloud transfers).
- Sufficient storage space on your PC.
- Updated software on both your iPhone and PC.
Using iCloud Photos for Transfer
Setting Up iCloud Photos
iCloud Photos is a convenient way to keep your photos synced across all your Apple devices. To set it up:
- On your iPhone, go to Settings > [your name] > iCloud > Photos.
- Toggle on iCloud Photos.
This feature automatically uploads and stores your original, full-resolution photos and videos in iCloud, allowing you to access them from any device.
Checking iCloud Storage
Ensure you have enough iCloud storage to accommodate your photo library:
- Open Settings on your iPhone.
- Tap [your name] > iCloud.
- Check the storage bar to see your available space.
- If needed, tap Manage Storage to upgrade your plan.
Importing Photos to Mac
Connecting iPhone to Mac
To import photos directly to your Mac:
- Connect your iPhone to your Mac using a USB cable.
- Unlock your iPhone and tap Trust This Computer if prompted.
Using the Photos App on Mac

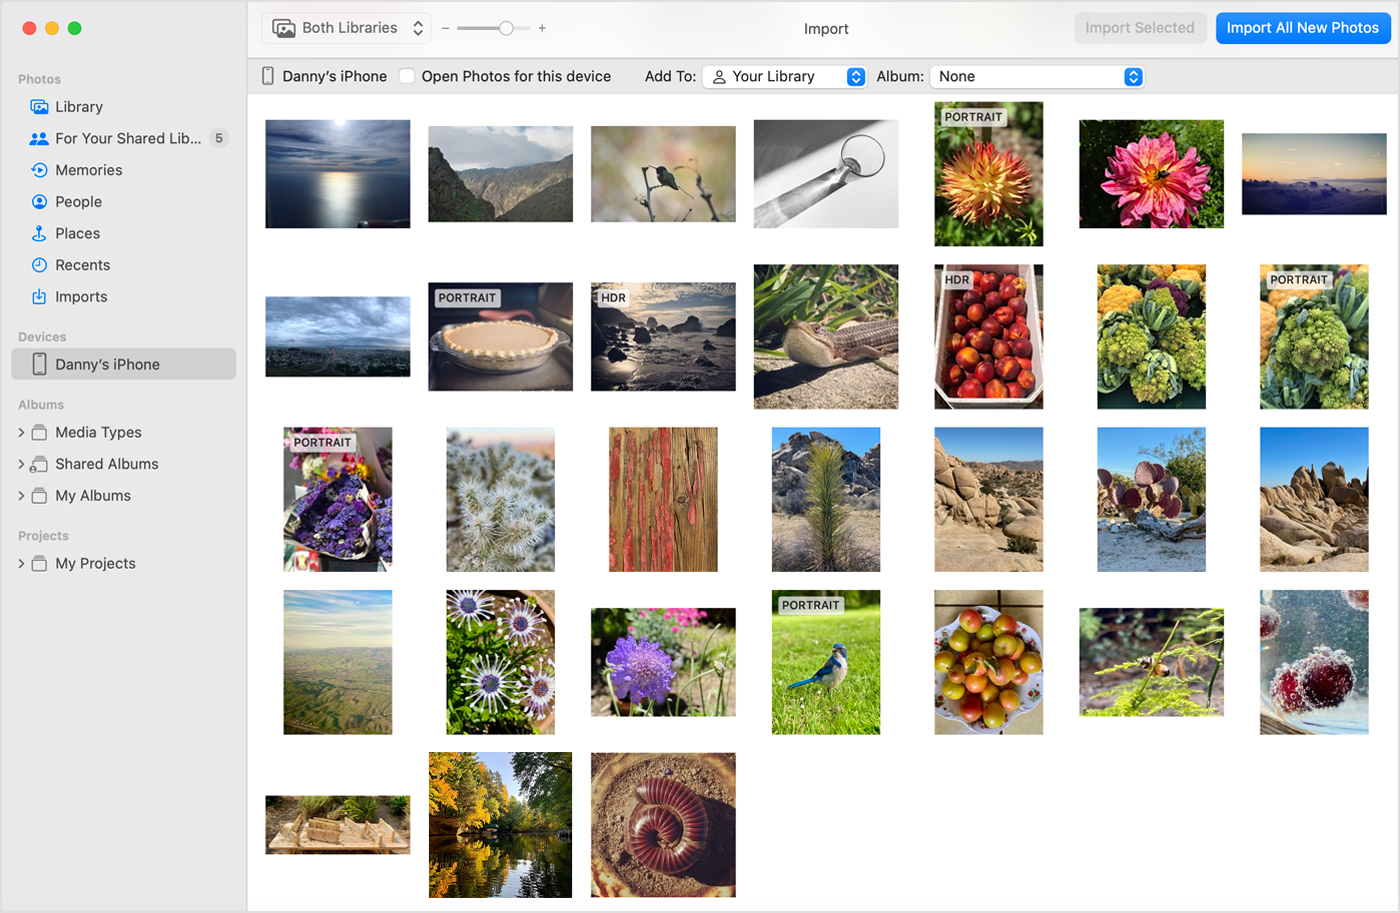
- Open the Photos app on your Mac.
- The app will show an Import screen with all photos and videos on your iPhone.
- If the Import screen doesn’t appear, click on your iPhone’s name in the sidebar.
- Select the photos you want to import and click Import Selected or Import All New Photos.
Troubleshooting Mac Import Issues
If you’re having trouble importing photos to your Mac:
- Ensure your Mac and iPhone are updated to the latest software versions.
- Restart both devices and try again.
- Check the USB cable and port for any damage.
Importing Photos to Windows PC
Installing Apple Devices App on Windows
- Go to the Microsoft Store and download the Apple Devices app.
- Install and open the app on your PC.
Connecting iPhone to Windows PC
- Connect your iPhone to your PC using a USB cable.
- Unlock your iPhone and tap Trust This Computer if prompted.
Using Microsoft Photos App
- Open the Photos app on your PC.
- Click Import > From a USB device.
- Follow the instructions to select and import the photos you want.
Downloading Full-Resolution Photos
If you use iCloud Photos, ensure that you download the full-resolution versions before transferring:
- On your iPhone, go to Settings > Photos.
- Select Download and Keep Originals.
Adjusting Photo Formats for Compatibility
To ensure compatibility with Windows:
- On your iPhone, go to Settings > Camera > Formats.
- Select Most Compatible to use JPEG and H.264 formats.
Manual Transfer via USB Cable
Step-by-Step USB Transfer Process
- Connect your iPhone to your PC using a USB cable.
- Unlock your iPhone and tap Trust This Computer.
- On your PC, open File Explorer and navigate to This PC > [Your iPhone].
- Open the DCIM folder to access your photos.
- Copy and paste the desired photos to your PC.
Common USB Transfer Issues
If you encounter issues:
- Ensure your USB cable is functioning properly.
- Restart both your iPhone and PC.
- Update your iPhone and PC to the latest software versions.
Using Third-Party Software
Best Third-Party Software Options
Several third-party applications can facilitate photo transfer:
- iMazing: A user-friendly app for transferring and managing iPhone data.
- AnyTrans: Supports seamless data transfer between iPhone and PC.
- CopyTrans: Allows for quick and easy photo transfers.
Security Considerations
When using third-party software, ensure that:
- The software is from a reputable source.
- You have updated antivirus software to scan for any potential threats.
Managing Photos After Transfer
Backing Up Transferred Photos
It’s crucial to back up your photos to prevent data loss:
- Use an external hard drive or cloud storage service.
- Regularly update your backups to include new photos.
Organizing Photos on PC
Organize your photos for easy access:
- Create folders based on dates, events, or locations.
- Use photo management software to tag and sort your images.
Conclusion
Transferring photos from your iPhone to your PC doesn’t have to be a cumbersome task. With the right tools and methods, you can easily safeguard your memories and free up space on your iPhone. Whether you opt for iCloud Photos, a direct USB transfer, or third-party software, this guide provides all the information you need for a smooth transfer process. Happy transferring!
Questions and Answers
How do I transfer photos from iPhone to PC using iCloud?
Enable iCloud Photos on your iPhone and download the iCloud app for Windows. Sign in and download your photos.
What’s the easiest way to transfer photos from iPhone to PC?
Using a USB cable and the Photos app on Windows or Mac is straightforward and quick.
Can I transfer photos without using iTunes?
Yes, you can use iCloud Photos, the Photos app on Windows/Mac, or third-party software.
Do I need internet access to transfer photos?
For iCloud transfers, yes. For USB transfers, no.
How can I ensure my photos are transferred in full resolution?
Ensure you download the original, full-resolution versions on your iPhone before transferring.
What if my iPhone doesn’t show up on my PC?
Check the USB connection, restart devices, and ensure all software is up to date.
Can I transfer photos using Bluetooth?
No, iPhones do not support Bluetooth file transfers to PCs.
Is third-party software safe to use?
Use reputable software and ensure you have updated antivirus protection.
How can I organize my photos after transferring them?
Create folders and use photo management software to tag and sort images.
What are the benefits of transferring photos to a PC?
More storage space, better organization, and easier editing and sharing options.

